|
This is a post that I never anticipated writing. There are already so many great articles on the web that detail this process that it feels unnecessary. But with the latest update to ArtEx (and my penchant for trying to tie together updates and articles) I simply couldn't not write it. To change things up though, my good friend Shafik Punja aka @qubytelogic (who may be known to one or two of you) suggested we co-author the article. He had already been researching and documenting the various extraction methods and the pro's and con's for each. (And working next to him it was hard to shoo him away!) And so here we are.
What we will try to do differently from other articles is to bring as much information as possible into one place. It is not feasible to cover all eventualities but this article will attempt to walk you though all the steps required to go from a fresh MacOS install and a uncompromised iOS Device to having a Full File System Extraction from a freshly JailBroken device.
WARNING: To be clear, the instructions below could result in bricking your device. Jailbreaking always carries risks and it is up to you to weigh the risk vs reward. Be sure to test these instructions on an exemplar device prior to an exhibit but bear in mind that just because it works on once does not guarantee success on another device. Proceed at your own risk!
Since it's release back in September 2019, the iOS Exploit Checkm8 has seemingly taken the world by storm. And it's easy to see why. A single exploit that affects every iOS device made over a ~5 year period is massive. So much so that it has the attention of some of the biggest name vendors in forensics who are taking advantage of the exploit in their tools to extract full file systems; something that only agencies with deep pockets could previously do.
I should state pretty early on for anyone who isn't familiar:
1) Checkm8 is the iOS BootROM vulnerability explout which affects iPhone 4S through to iPhone X(A5 to A11 chipsets).
2) Checkra1n is the JailBreak (JB) that utilizes the Checkm8 exploit and affects iOS operating systems 12.3 and up.
3) Both use DFU (Device Firmware Update) mode, where the vulnerability exists within the code of the BootROM; making it possible to take over the boot process and execute unsigned code on devices.
(Usually, each step of the boot process performs integrity checks to ensure a secure boot occurs; this exploit affects the very first step causing all further integrity checks to be moot).
4) To obtain a Full File System (FFS) extraction, you must know the passcode. There is NO BRUTE FORCE SUPPORT. For the purposes of this article, we will not be discussing BFU (Before First Unlock) JailBreaking of BFU Extractions.
5) Without the passcode, you can still extract data, but the data you get will be not include any of the encrypted data (ie. user data) and will basically be limited to data that the device requires at all times and therefore cannot encrypt.
Admittedly, my experience with Checkm8 and CheckRa1n was pretty late in the game. I'm lucky enough that I didn't need it in order to get full file system extractions, so using it was more for curiosities sake than because of an actual need. That also meant that I never needed to pay too much attention to the format that these tools all save as and goes some way to explaining why they were not supported by ArtEx.
For example, Cellebrites Checkm8 solution saves the extraction as a DAR file; a little used archive format that up until recently no one else really supported. All other tools that I've come across at the moment save as a TAR archive which is much more widely supported. This is the type I'm now supporting with ArtEx and is the reason for this post.
Tools such as those by Elcomsoft, Oxygen and BelkaSoft all produce Full File System extractions of devices that are vulnerable to the CheckRa1n JailBreak. The resulting TAR files are usable by ArtEx in exactly the same way that GK Extractions are.
The method we are going to focus on however is the method developed by fellow foreniscator Mattia Epifani available at https://github.com/RealityNet/ios_bfu_triage which is a free and awesome tool that is also pretty straight forward to use once the preperation steps are completed.
- Apple computer (Some of these steps will also work on Linux but this is outside of the scope of this article).
- Target iOS device must be vulnerable to Checkm8 and CheckRa1n.
To add more clarity here, the exploit 'Checkm8' runs on any iOS device from an iPhone 4S up to and including an iPhone X. However, the JailBreak 'CheckRa1n' only works on devices running iOS 12.3 and above.
This means that there are some devices that are vulnerable to CheckM8 (such as the iPhone 4S and 5) but not CheckRa1n because they cannot run iOS12 or above. There are also devices (such as the iPhone XR or XS) that will run iOS12 but are not vulnerable to CheckM8.
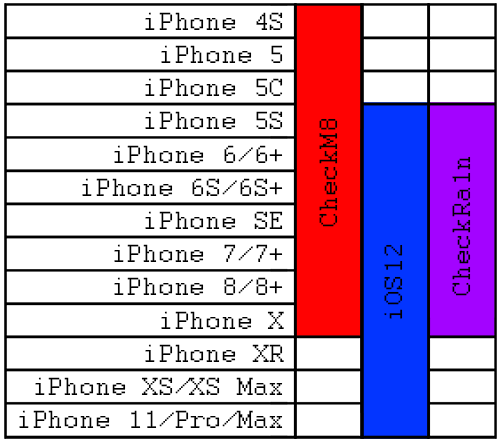
This leaves a sweet-spot (Shown in purple) of around 7 generations of device that are vulnerable to the exploit (Red) and are capable of running a supported version of iOS (Blue).
A list of maximum iOS versions by device can be found at https://iosref.com/ios/
In preparation for extracting a phone, there are a few pieces of software you need to install on your computer. It is recommended to do these in the order they appear below as some of the tools are dependent on others.
*The following information was compiled using MacOS 10.15.4 Catalina.
 |
Tip! Click this icon to copy the terminal command to the clipboard |
|
This is the actual JailBreak software. It is available from https://checkra.in/.
At the time of writing, the latest version was 0.10.1 beta.
The older releases of checkra1n show as all beta previews. The change logs for the latest release 0.10.1 beta shows added support of iOS 13.4 and 13.4.1.
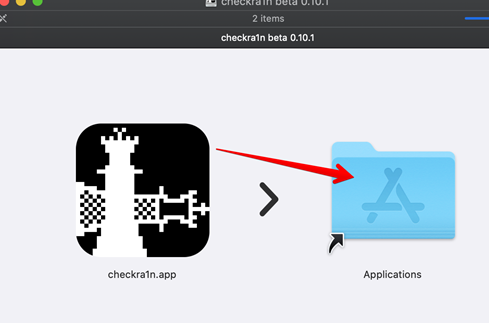
Once this exploit is downloaded (as a .dmg file) double click the download and drag the checkra1n.app into the Applications folder to install.
|
|
XCode is the Apple Integrated Design Environment (IDE) to create Apple Mac OS and iOS Applications. Typically, the IDE is a graphical interface and is available from the Mac OS App Store. However, for this process, you will need the Command Line Tools which do not get installed with the App Store version of XCode. I typically install both but the Command Line Tools should install without the need for XCode.
To Install Command Line Tools, start the MacOS Terminal and type:
 |
xcode-select --install |
Once installation has finished, you can type the following to ensure installation worked.
 |
xcode-select -p |
Which should return:
/Applications/Xcode.app/Contents/Developer
The Command Line Tools includes a module called GNU Compiler Collection (gcc) which includes libraries for various languages and is necessary for this extraction process to work.
You can also confirm that gcc is installed by typing:
 |
gcc --version |
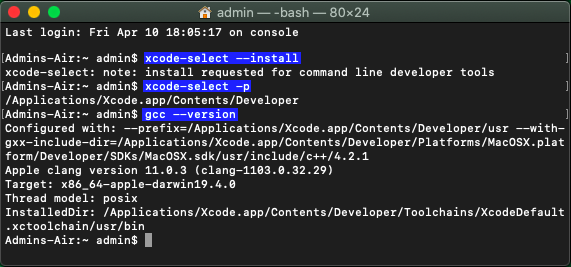
Further reading on Command Line Tools can be found at https://medium.com/flawless-app-stories/install-command-line-tools-on-macos-catalina-anansewaa-com-6f8c63120fd8
*Sometimes, copying and pasting from a website into terminal can include characters that cause issues. If any errors occur, try typing the command instead of copy/paste to see if the issue is resolved. |
|
HomeBrew is a free package management tool for MacOS. It makes it easy to install software from outside of the Apple ecosystem.
More information about HomeBrew can be found at https://brew.sh/
To install, enter the MacOS Terminal and type:
 |
/bin/bash -c '$(curl -fsSL https://raw.githubusercontent.com/Homebrew/install/master/install.sh)' |
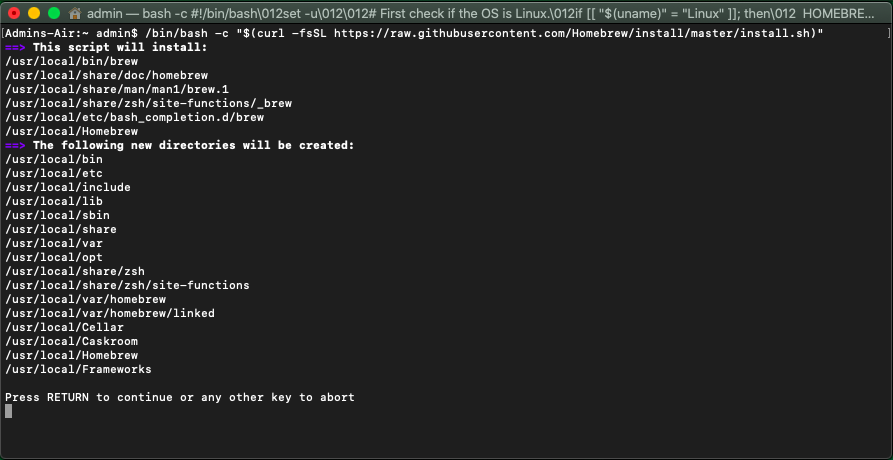
This output in the terminal window explains what will be installed and where.
Press RETURN to start the installation.
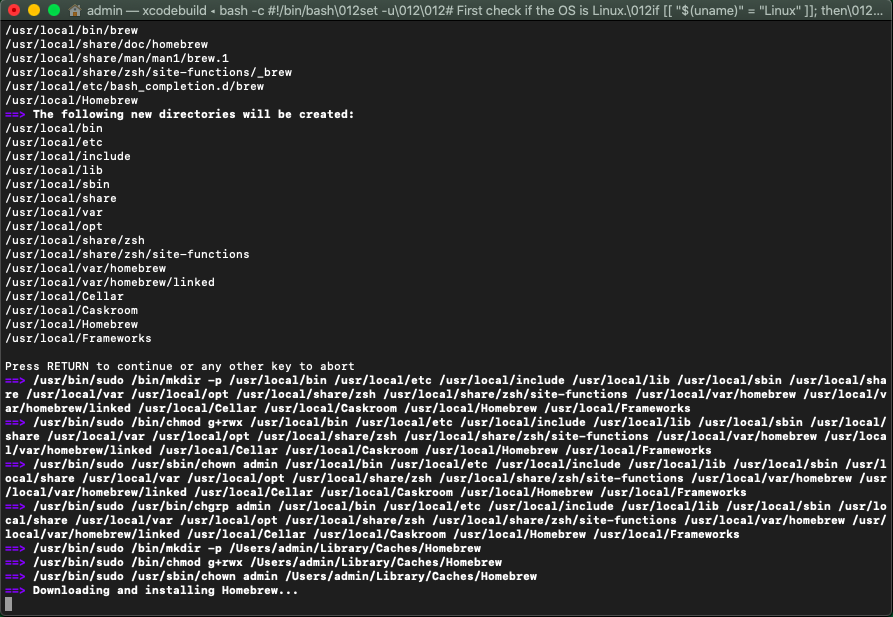
This process can take a good few minutes. Use that time to go make yourself a brew. :)
*Sometimes, copying and pasting from a website into terminal can include characters that cause issues. If any errors occur, try typing the command instead of copy/paste to see if the issue is resolved.
|
|
Information on libimobiledevice can be found at https://www.libimobiledevice.org/
libimobiledevice is a cross platform protocol tool for speaking to iOS devices.
It is installed via HomeBrew from the MacOS Terminal using the command:
 |
brew install libimobiledevice |

*Sometimes, copying and pasting from a website into terminal can include characters that cause issues. If any errors occur, try typing the command instead of copy/paste to see if the issue is resolved.
|
|
Information on SSHPASS can be found at https://gist.github.com/arunoda/7790979
According to that page, SSHPASS is "a tiny utility, which allows you to provide the ssh password without using the prompt. This will very helpful for scripting."
Again, we will use HomeBrew to install from the MacOS Terminal using the command:
 |
brew install https://raw.githubusercontent.com/kadwanev/bigboybrew/master/Library/Formula/sshpass.rb |
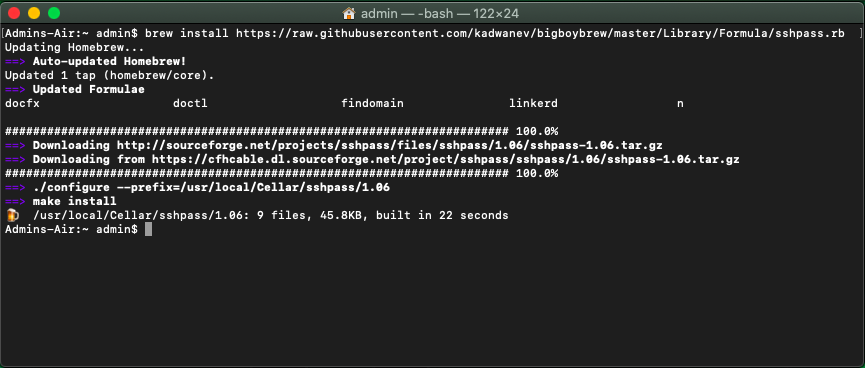
*Sometimes, copying and pasting from a website into terminal can include characters that cause issues. If any errors occur, try typing the command instead of copy/paste to see if the issue is resolved.
|
|
Dialog is little tool to make MacOS show user friendly dialog boxes from shell scripts. It is available from http://macappstore.org/dialog/
Again, we will use HomeBrew to install from the MacOS Terminal using the command:
 |
brew install dialog |

*Sometimes, copying and pasting from a website into terminal can include characters that cause issues. If any errors occur, try typing the command instead of copy/paste to see if the issue is resolved.
|
|
iOS BFU Triage is the application that will actually extract the data. It is available from https://github.com/RealityNet/ios_bfu_triage
Follow the link above and select "Clone or Download" > "Download as Zip".
Open the downloaded Zip file and extract the file "ios_bfu_triage.sh" to the location you want to save the extraction to, such as your desktop.
We now need to make the script executable by changing the permissions of the file.
From the Terminal window, navigate to the path where you saved the "ios_bfu_triage.sh" file.
Navigation within Terminal is done by typing "cd " followed by the folder name you want to enter or "cd .." to go backwards through the directory structure.
Your current folder is visible within the prompt..
Admins-Air :- Admin$
This indicates that you are currently within the "Admin" folder.
Typing "ls' will "List" all subfolders and files within the current folder. |
Once you are in the correct folder, type
 |
chmod +xios_bfu_triage.sh |
Assuming this works, there will be NO REPONSE from the Terminal. It will simply return to the prompt.
|
OK, By now, everything should be installed and setup. We are ready to JailBreak our iPhone!
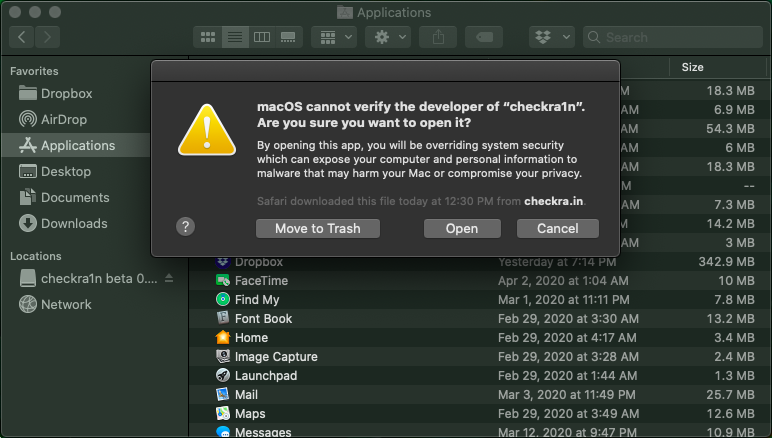
- When you start the checkra1n app for the very first time (or a new version of checkra1n for the very first time) you will likely get a warning prompt saying the app cannot be opened because it is not verified. Press Cancel. This will close the warning window.
- The easiest way to get around this issue is to open the 'Applications' window in Finder and Right Click on the CheckRa1n application.
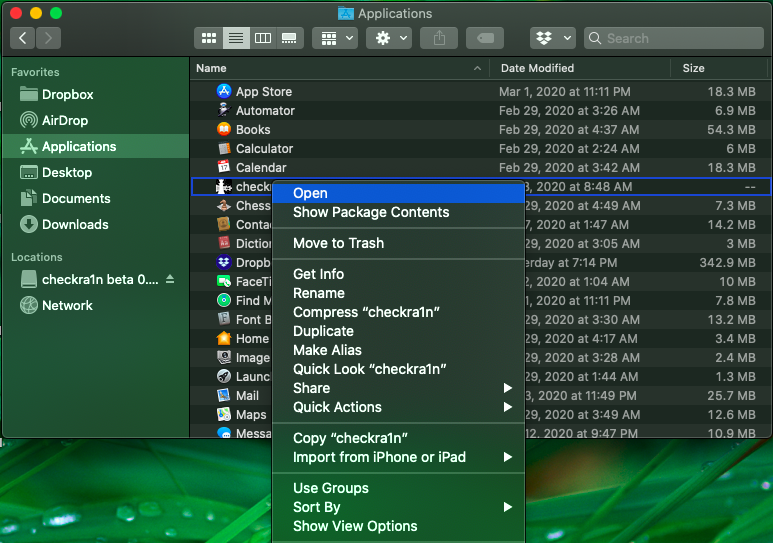
- Selecting 'Open' from this menu will provide a different warning from the one you were previously given and you now have the option to ignore the warning and open the application anyway.
- The CheckRa1n software will now start.
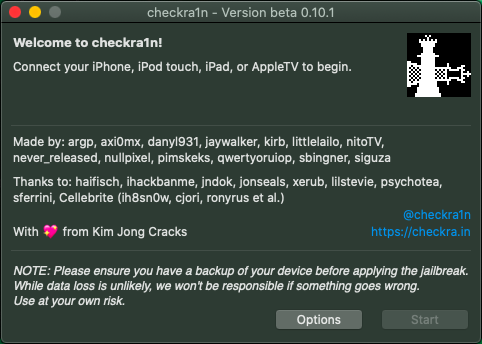
(The screenshot above has no iPhone connected - hence the instruction to connect a device)
- Connect your device.
This is a reminder of the requirements of the device:
- No passcode set or known Passcode.
-
Trust relationship with computer must exist / be created.
- Must be an iPhone 5S through X running iOS 12.3 or above.
- If the device you have connected is not supported, you will be told so.
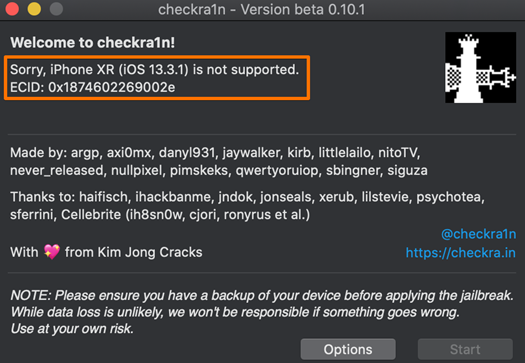
- Connecting a supported device will enable the 'Start' button.
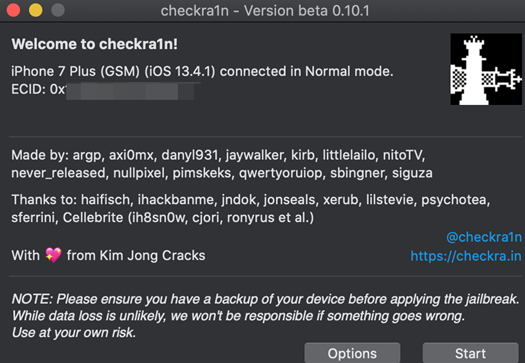
- The CheckRa1n interface is super easy to use and walks you through putting the device into DFU Mode.
More information on Device Firmware Update (DFU) Mode can be found on http://www.theiphonewiki.com/wiki/DFU_Mode
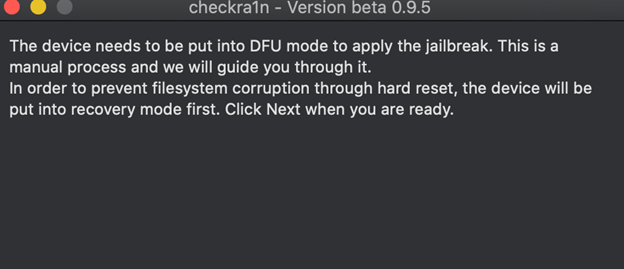
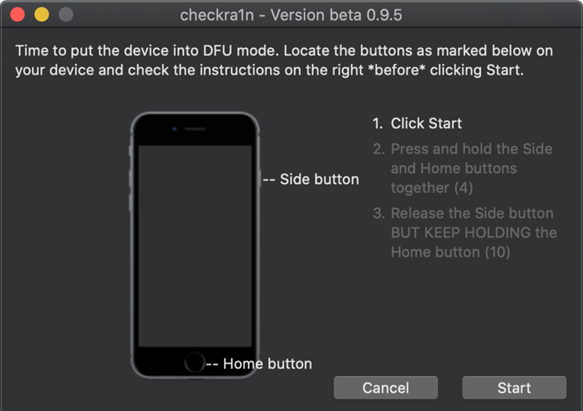
- Once the supported iPhone device is in DFU mode, checkra1n will auto-magically go to the next step, jailbreaking the device.
When in DFU mode (prior to the jailbreak being executed), you will not be able to visually identify the device is in a DFU state. The only visual observation you can make is that the device screen is black and it looks like it is turned off. But that is NOT the case. In the background, CheckRa1n is doing its thing.
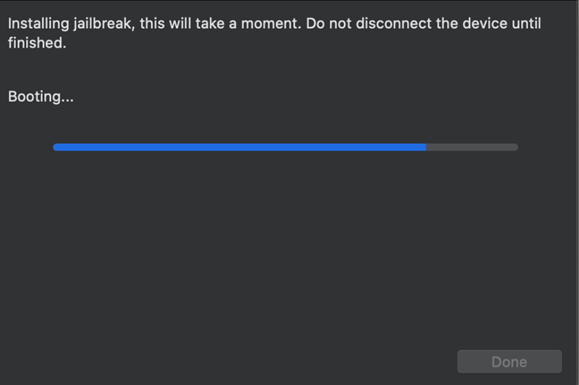
- When your device reboots, your device will display (in very small font), a running screen of the commands being executed on the device. Once the JB is successfully installed, an ‘All Done’ message screen will be presented.
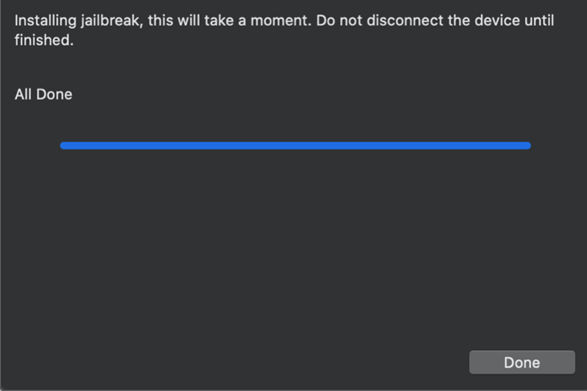
- Press Done. Congratulations! You have just JailBroken a supported iPhone.
- Check your device and you should find a 'checkra1n' icon.
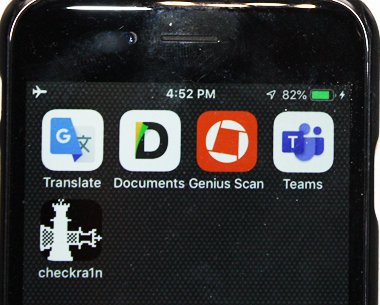
(Note that Cydia is not installed as the device is in Airplane Mode - It is NOT needed for this extraction process)
Now that we have a prepared computer and a prepared iDevice, we can finally start the extraction.
1. Return to the Terminal Shell.
2. Create two more Terminal Shells.
3. We will refer to the 3 Terminal Shells as A (The original shell), B and C (The two new shells).
4. In Terminal Shell B, you need to create a connection between the device and computer. To do this, we will use the tool 'iproxy' which was installed with libimobiledevice.
5. Enter the command
 |
sudo iproxy 22 44 |

This command breaks down as follows:
sudo - Super User DO; Executes the command with elevated priveliges (usually root)
iproxy - Enables TCP service access to the iOS device.
22 - Port number to connect to on iOS Device.
44 - Port number to connect to on localhost (Computer).
As you are requesting use of sudo, you will be required to enter you admin password.
6. From Terminal Shell C, enter the command
 |
ssh root@localhost |

This will initiate a SSH connection into the Terminal Session of the connected iOS device.
You will be prompted to verify the RSA Authentication of the iDevice. Type 'yes' and press enter.
7. You will now be prompted for the root password of the iOS Device. The default password used by Apple on iOS devices is
 |
alpine |
Press Enter.
8. You may notice that Terminal Shell B updates. You can observe the serial
value, shown in the Terminal Shell B output, is the UDID of the device.
9. Back in Terminal Shell C, you will see you are now in the Bash Shell of the device and have root privilidges (This is denoted by the # symbol).

10. If you like, you can quickly query the root level file system of the connected iDevice with the following command which will provide a list of files, folders, timestamps and permissions.
 |
ls -lah |
11. Back in Terminal 1, execute the "ios_bfu_script.sh" by entering
 |
./ios_bfu_script.sh |
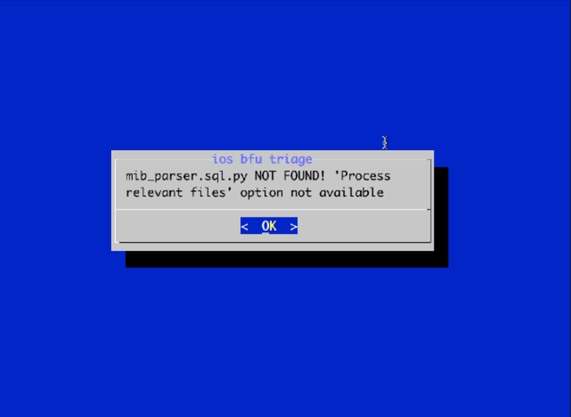
12. You will be warned that the 'mib_parser.sql.py' script is not present. This is one of the optional requirements of the script in order to automatically parse some of the data. This is outside the scope of this article and will not affect the ability to extract to the Full FileSystem. Press 'OK' to go passed the warning.
13. You will now see a list of 9 options. For the purposes of this article, we are only concerned with an FFS extraction
which is option 6. We are not going to cover the other options.
All 9 options are explained very well, in the article written by the tools author Mattia Epifani: https://blog.digital-forensics.it/2019/12/checkra1n-era-ep-5-automating.html
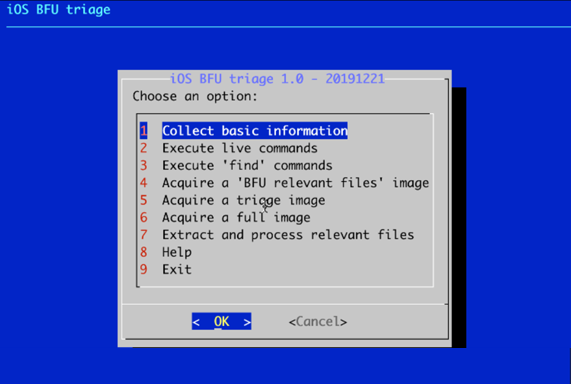
14. Select option 6 and press "Yes".
15. Once you confirm your selection, the extraction will start. The approximate extraction speed with this method is given as 25GB/Hr which we have found to be about right.
16. The extracted data is placed into subfolders within the same folder location as the
'ios_bfu_triage.sh' script file.
The subfolder is named after the UDID value of the device. From the screenshot
below you can see the output of two files which contain the exact same information but displayed differently: '.txt' file which is a straight text file, and
a '.plist' file (XML formatted plist [property list]) file, both of which can be
viewed with any text editor tool.

17. The information in the log file for the FFS extraction is shown in the screenshot
below. A SHA1 hash function was completed against the '.tar' file.

18. Back in the main menu, when you are finished, select option 9 to exit and
press ENTER to accept OK.
19. You have now got a Full FileSystem extraction of the device. Simply rebooting the device will remove the CheckRa1n JailBreak.
SSH IS NOT WORKING!
Did you start the SSH Connection?
Is the Port you specified already in use? A reboot usually solved the problem but is not always appropriate.
In these cases, enter
 |
ps -ax | grep iproxy |
This command breaks down as:
ps - Process status information about processes running in memory
-ax - command arguments for Process Status
a - Display processes for All users.
x -
Display information about processes without controlling terminals
| - is the Pipe command to redirect the output to the next command which follows the pipe.
grep - Command line utility to search for matching patterns of characters after the grep command.
This will list all Process ID's (pid) that contain the keyword "iproxy".
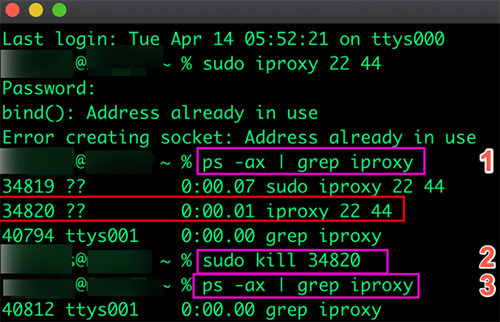
You can see in the above image that the PID for the command iproxy 22 44 is 34820.
Obviously, you will need to replace the PID 34820 with the PID from your computer.
The image above also show the repeat of the grep command which now shows the iproxy processes have ended.
RSA Host Key Verification Fail
After the iproxy command was succesfully run in Shell B, the command 'ssh root@localhost' is run in Shell C.
At this stage, you should have recieved a prompt to accept the RSA Key fingerprint but you may also ge the error 'Host key verification failed'.
Shell B shows an updated messages stating "recv failed: Connection reset by peer".
The solution is to remove the known hosts file from the ssh directory. This will force a
new known_host file to be generated upon connection.
To do this; in Terminal Shell C enter the command
| rm ~/Users/<useraccount>/.ssh/known_hosts |
But substitute <useraccount> for your account username.
If the command was succesfully executed, you will be returned to the command propt with no error messages. Enter the ssh root command again and it should work fine.
 |
ssh root@localhost |
Once you have the extracted data, it can be parsed using vendor tools such as UFED Physical Analyzer, Axiom, Blacklight, Oxygen etc. or using community driven tools such as ArtEx or iLEAPP.
For the most part, all tools should/will obviously find the same results.
Some tools may perform better than others in some respects and worse in others. The layout may be preferable in one tool over another. Whatever the reason, I whole-heartedly recommend parsing the extraction in as many different tools as time and budget allows and verify your findings where possible.
Which leads me on to say to keep an eye out for my upcoming post showing the results of analysis using ArtEx. My goal is to create a single "report" which I continue to update whenever new artifacts and features are made available so that there is always an up to date view of the current capabilities of the software.
Even though this method may not be as forensically sound as some of the other paid methods, for a free tool, this is a fantastic way to extract the data from the device.
Thank you for reading! Don't forget that ArtEx can be download FREE from the 'Software' section of my site.
Unlike many of my other blog posts, this post took information from many other sources and distilled them into what I hope is a simple guide for extracting data from an iDevice. More information can be found from the links below.
List of checkra1n releases with https://www.theiphonewiki.com/wiki/Checkra1n
DFU for various iPhone devices: https://www.theiphonewiki.com/wiki/DFU_Mode
DFU versus SOS Mode: https://blog.elcomsoft.com/2020/01/ios-recovery-dfu-and-sos-modes-forensics/
Mattia Epifani iOS BFU Script and Blog Articles:
About DFIR Article Jailbreaking - Checkra1n Configuration
https://aboutdfir.com/jailbreaking-checkra1n-configuration/
Other Articles Worth Reading
https://blog.elcomsoft.com/2019/11/ios-device-acquisition-with-checkra1n-jailbreak/
https://blog.oxygen-forensic.com/everything-you-ever-wanted-to-ask-about-checkm8-and-checkra1n/
https://www.andreafortuna.org/2020/01/10/ios-forensics-bfu-before-first-unlock-acquisition-using-checkra1n/
Belkasoft Article: https://belkasoft.com/belkasoft_vs_checkra1n
https://kubadownload.com/news/checkra1n-jailbreak
Copied to clipboard!
|


